Monarco HAT driver for the REXYGEN system
(the MonarcoDrv module)
User guide
Plzeň (Pilsen), Czech Republic
2022-11-22
Contents
1.1 Introduction
1.2 Installation of the driver on the host computer
1.3 Installation of the driver on the target device (Raspberry Pi)
2 Including the driver in the project
2.1 Adding the MonarcoDrv driver
2.2 Configuration dialog of the MonarcoDrv driver
3 Connecting the inputs and outputs in the control algorithm
3.1 Direct input and output signals
3.2 Modbus communication via RS-485
3.3 1-Wire sensors and expansion modules
4 Troubleshooting
Chapter 1
The MonarcoDrv driver and the REXYGEN system
1.1 Introduction
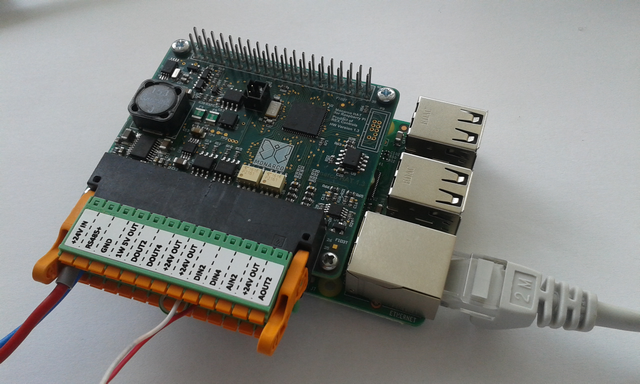
This manual describes the MonarcoDrv driver for direct access to inputs and outputs of the Monarco HAT [1] within the REXYGEN system. The driver was developed by the REX Controls company.
For a quick-start and step-by-step instructions see [2].
1.2 Installation of the driver on the host computer
The MonarcoDrv driver is included in the installation package of the Development tools of the
REXYGEN system. It is necessary to select the corresponding package in the installer. The
REXYGEN system typically installs to the
C:\Program Files\REX Controls\REX <version> folder.
The following files are copied to the installation folder:
- Bin\MonarcoDrv_H.dll – Configuration part of the MonarcoDrv driver.
- Doc\PDF\ENGLISH\MonarcoDrv_ENG.pdf – This user manual.
1.3 Installation of the driver on the target device (Raspberry Pi)
If there is no RexCore runtime module installed on your Pi, install it first using the Getting started guide of REXYGEN [2]. The installation includes all necessary drivers including MonarcoDrv.
If you want to install MonarcoDrv separately, it can be done from the command line of
Raspberry Pi using the command
sudo apt-get install rex-monarcodrvt
Chapter 2
Including the driver in the project
The driver is included in the project as soon as the driver is added to the project main file and the inputs and outputs are connected in the control algorithm(s).
2.1 Adding the MonarcoDrv driver
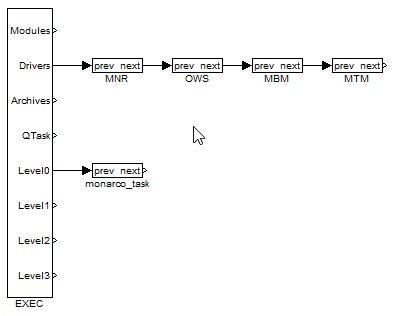
The project main file with the MonarcoDrv driver included is shown in Figure 2.1.
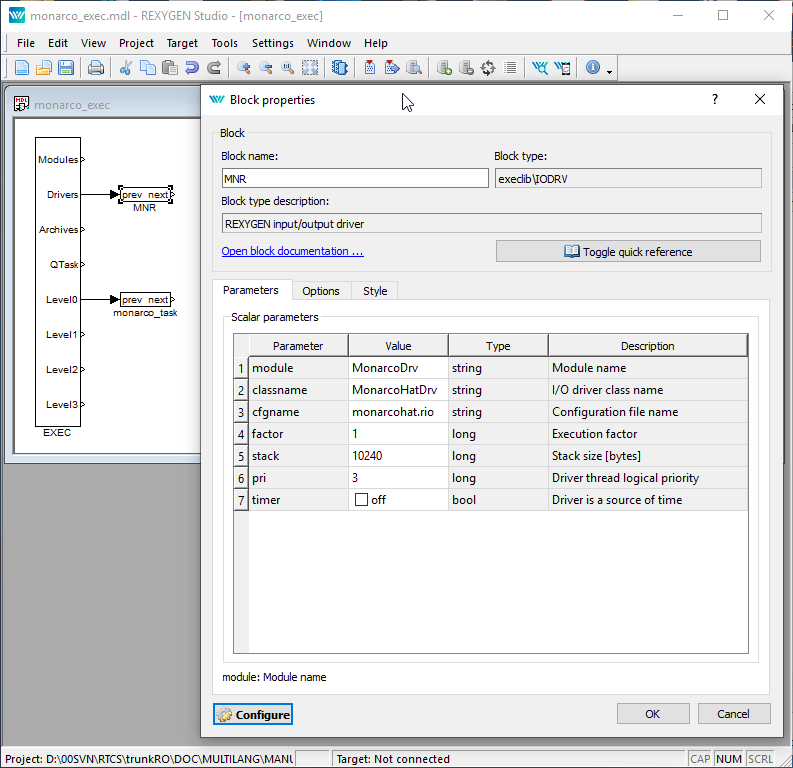
There is one block which must be added to the project to include the driver. A block of type IODRV renamed to MNR and connected to the Drivers output of the main EXEC block. The name of this block (MNR, see Fig. 2.1), is the prefix of all input and output signals provided by this driver. The three most important parameters are:
- module – name of the module linked to the driver, in this case MonarcoDrv – the name is CASE SENSITIVE!
- classname – class of the driver, in this case MonarcoHatDrv – the name is CASE SENSITIVE!
- cfgname – name of the driver configuration file, e.g. monarcohat.rio
- factor – multiple of the EXEC block’s tick parameter defining the driver’s task execution period
The above mentioned parameters of the IODRV function block are configured in REXYGEN Studio program. The configuration dialog is shown also in Fig. 2.1.
The Configure button opens the configuration dialog of the MonarcoDrv driver, which is described in chapter 2.2.
2.2 Configuration dialog of the MonarcoDrv driver
The configuration dialog can be activated from REXYGEN Studio by pressing the Configure button in the parameters dialog of the IODRV block (see chapter 2.1).
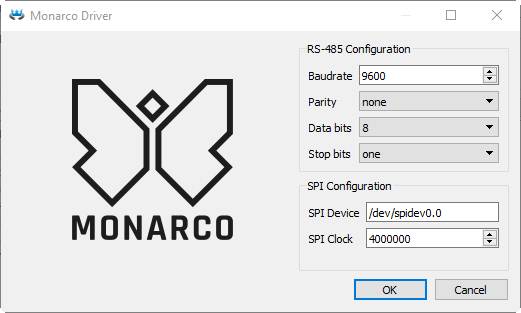
The RS-485 section configures the properties of the RS-485 bus for connecting to external devices.
IMPORTANT: Note that the internal communication between the CPU and the MCU of the Monarco HAT uses UART communication (/dev/ttyAMA0 on the Raspberry Pi) at 115200 baudrate, 8 bits per byte, no parity, 1 stop bit. These are the values you have to use in the Modbus driver configuration if you are willing to use it. For details about the internal structure of the Monarco HAT visit http://www.monarco.io.
The SPI configuration section defines the communication between the CPU and the Monarco HAT MCU (/dev/spidev0.0 on the Raspberry Pi, maximum clock speed is 4 MHz).
Chapter 3
Connecting the inputs and outputs in the control algorithm
The inputs and outputs of the driver must be interconnected with the individual tasks (.mdl files). The individual tasks (QTASK or TASK blocks) are connected to the QTask, Level0,…, Level3 outputs of the main EXEC block.
3.1 Direct input and output signals
The inputs and outputs of the MonarcoDrv driver can be accessed as shown in Fig. 3.1.
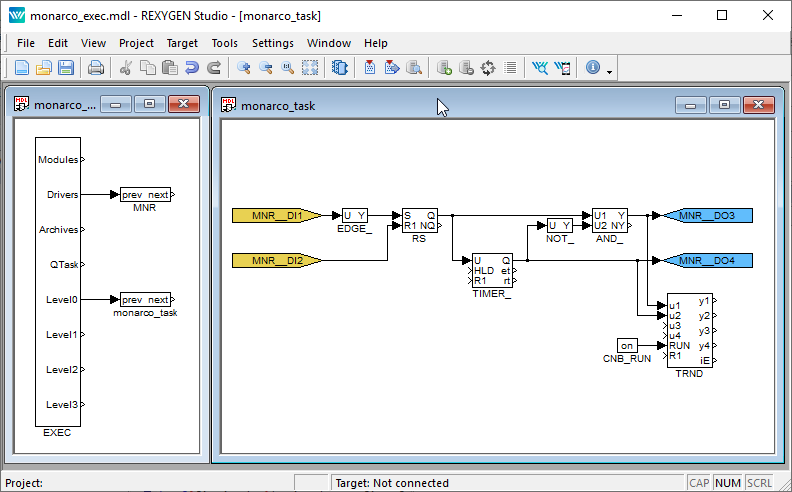
One block of the From type allowing the user to read one input has the Goto tag set to MNR__DI1, while the other has this tag set to MNR__DI2. The number in the flag corresponds with the terminal pinout. The block of Goto type allowing the user to set (write) one output has the Goto tag) set to MNR__DO3, the other output is accessed via the MNR__DO4 flag. The blocks always have the MNR prefix right at the beginning of the tag followed by two _ characters (underscore).
Similarly for other pins we can use e.g. the flags:
- Goto, MNR__DO4 – digital output 4
- Goto, MNR__AO1 – analog output 1
- From, MNR__AI1 – analog input (voltage mode 0..10V)
- From, MNR__AI2C – analog input (current mode 0..20mA)
- Goto, MNR__LED5 – Onboard LED 5
- Goto, MNR__LED5_Mask – Only when TRUE, onboard LED5 can be controlled from algorithm
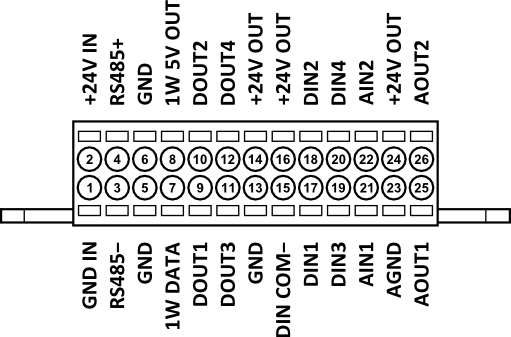
In general, the link to a particular signal consists of the driver name MNR, two underscore characters __, signal reference, signal number and an optional symbol defining the mode of the input. The terminal numbering of the Monarco HAT is shown in Fig. 3.2.
All the input and output flags for the Monarco HAT are available in the example project 0121-00, which is part of the installation package. The most up-to-date examples are available at https://github.com/rexcontrols/REXexamples/archive/v2.50.zip.
3.2 Modbus communication via RS-485
The RS-485 bus provides a standard interface to communicate with external devices (servo drives, energy meters, etc.) or to expand the I/O capabilities of the Monarco HAT itself. Modbus communication is typically used. There is a separate driver for Modbus communication in the REXYGEN system, see [3].
IMPORTANT: Note that the internal communication between the CPU and the MCU of the Monarco HAT uses UART communication (/dev/ttyAMA0 on the Raspberry Pi) at 115200 baudrate, 8 bits per byte, no parity, 1 stop bit. These are the values you have to use in the Modbus driver configuration if you are willing to use it. For details about the internal structure of the Monarco HAT visit http://www.monarco.io.
Figure 3.3 shows an example project main file with multiple I/O drivers.
3.3 1-Wire sensors and expansion modules
The 1-Wire bus provides additional interface to expand the I/O capabilities of the Monarco HAT itself (e.g. using 1-Wire temperature sensors, relative humidity sensors, relay modules etc.). There is a separate driver for 1-Wire communication in the REXYGEN system, see [4].
Figure 3.3 shows an example project main file with multiple I/O drivers.
Chapter 4
Troubleshooting
In the case that the diagnostic tools of the REXYGEN system (e.g. REXYGEN Diagnostics) report unexpected or incorrect values of inputs or outputs, it is desirable to test the functionality outside the REXYGEN system (command line tools, simple scripts, etc.). Also double check the configuration – the most common problems include:
- Hardware problem – incorrect wiring.
- Internal communication problem – SPI bus, I2C bus or UART is occupied by another service or program.
In the case that the given input or output works with other software tools and does not work in the REXYGEN system, report the problem to us, please. E-mail is preferred, reach us at support@rexygen.com. Please include the following information in your description to help us process your request as soon as possible:
- Identification of the REXYGEN system you are using. Simply export it to a file using the REXYGEN Diagnostics program (Target Licensing... Export).
- Short and accurate description of your problem.
- The configuration files of the REXYGEN system (.mdl and .rio files) reduced to the simplest case which still demonstrates the problematic behavior.
Bibliography
[1] REX Controls s.r.o.. Internet webpage www.monarco.io, 2020.
[2] REX Controls s.r.o.. Getting started with REXYGEN and Monarco HAT, 2020. .
[3] REX Controls s.r.o.. Modbus driver of REXYGEN – User guide, 2020. .
[4] REX Controls s.r.o.. OwsDrv driver of REXYGEN for 1-Wire devices – user guide, 2020. .
Documentation reference number: 14711
2022 © REX Controls s.r.o., www.rexygen.com